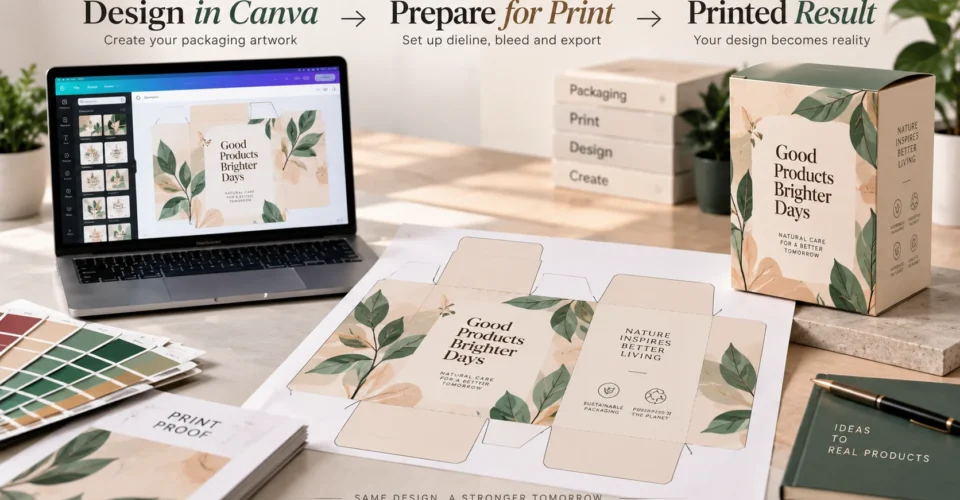
Yes, you can print from Canva. The right method depends on what you are printing. For a home printer, you can download the design as a PDF and print it at the correct scale. For a local print shop, you will usually want a print-oriented PDF and should follow that printer’s file requirements. For custom packaging, the process is more technical: the artwork needs to fit the supplier’s dieline, account for trim and folds, and meet the packaging printer’s color, bleed, and file specifications.
The key is not simply finding the Print button. A Canva design can look perfect on screen and still produce a white edge, soft image, shifted color, or misplaced text after physical production. The goal is to prepare the file for the physical result, not just make the design look right on screen.
Quick Answer: How Do You Print From Canva?
The basic workflow is: finish your design → check the final size and orientation → keep important content inside the safe area → extend edge-to-edge artwork into the bleed → choose Share → Download → select PDF Print when a print-ready PDF is appropriate → enable crop marks and bleed when required → download the file → review it before printing → send it to your printer or print it at home.
1. Start With the Correct Final Size
Before designing or printing, confirm the finished size of the piece. If you are printing a letter-size flyer, build for the required letter dimensions. If you are printing a product label, card, insert, or box panel, use the dimensions supplied by the printer or packaging manufacturer. If you need to review packaging dimensions before creating artwork, BoxNovo’s custom box dimensions resource can help you understand why the finished dimensions matter.
Do not assume that resizing at the end is harmless. Changing dimensions can alter text wrapping, spacing, image quality, and the relationship between artwork and trim.
For packaging, start with the dieline—not a blank Canva canvas.
A dieline is the flat structural template showing the panels, cut lines, fold lines, flaps, and other structural areas of a package. For a custom box, the packaging supplier should provide the dieline for the exact box style and dimensions. That makes the dieline the starting point for artwork, rather than something added after the design is finished.
2. Check Orientation Before Printing
Make sure the Canva document orientation matches the physical piece. This becomes especially important for double-sided printing. Review the printer’s setup before producing a large quantity.
- Portrait design → confirm the paper and printer orientation are also set correctly.
- Landscape design → verify the printer does not rotate or flip the artwork unexpectedly.
- Double-sided pieces → check which edge is used for the flip and confirm front/back alignment with a test sheet.
- Packaging panels → follow the dieline’s panel orientation rather than assuming every panel should read the same way.
3. Understand Bleed, Trim, and the Safe Area
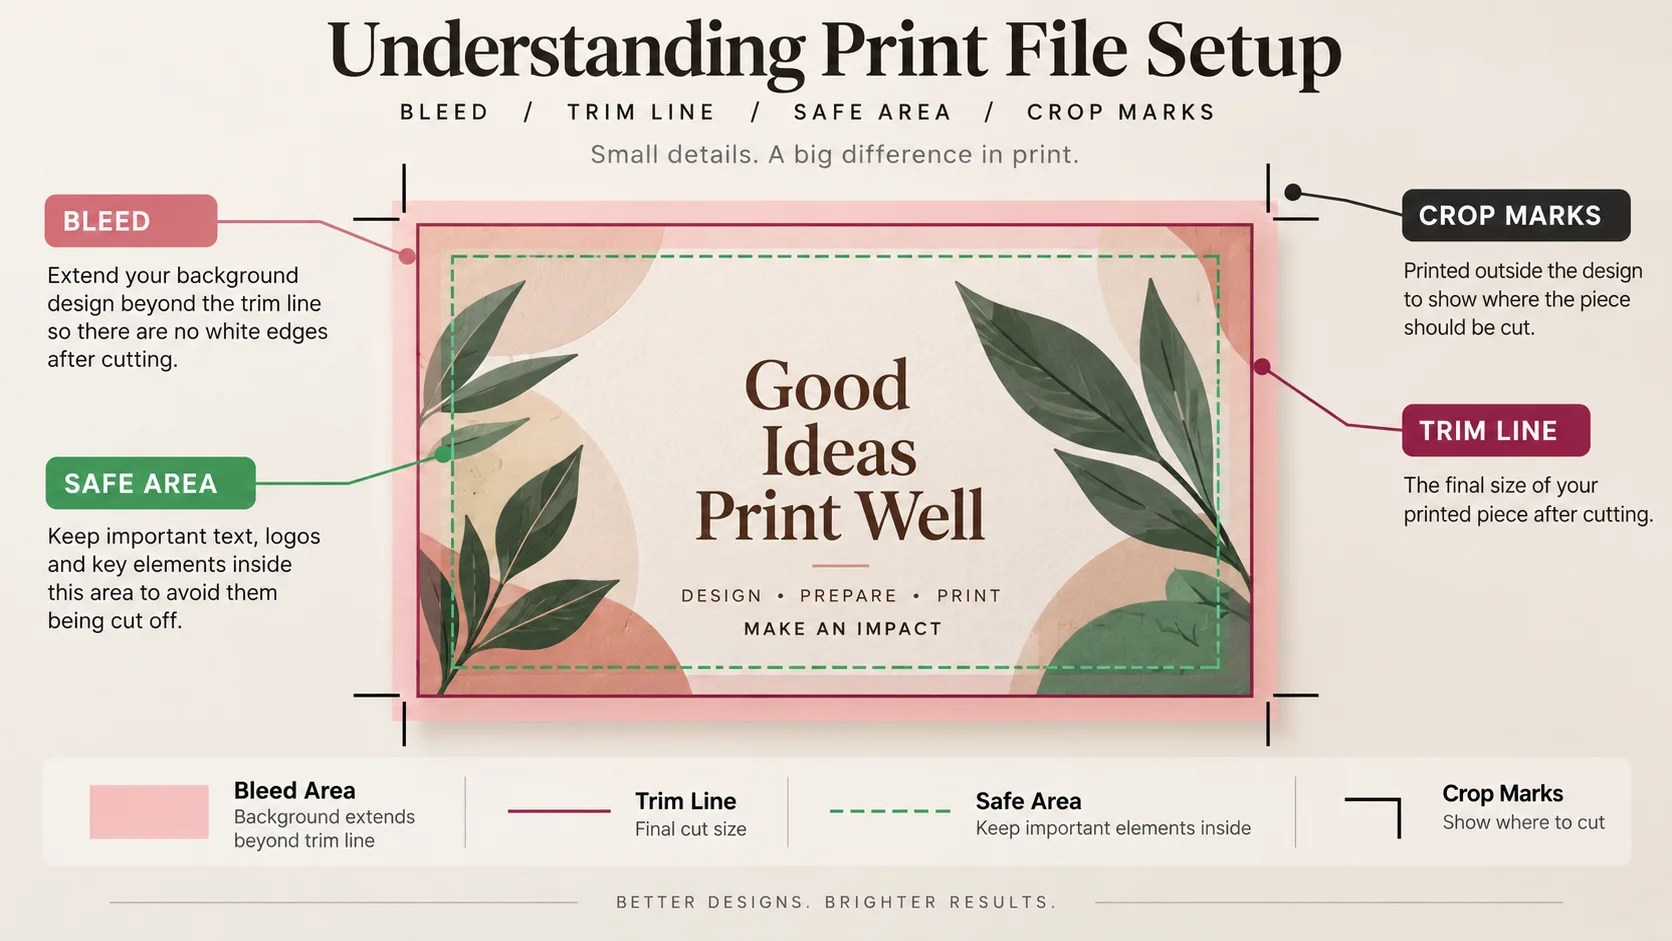
Bleed is extra artwork that extends beyond the final trim edge. It gives the cutting process room to vary slightly without exposing an unintended white edge. The trim line is where the finished piece is cut. The safe area is the interior region where important content should remain.
For a standard printed piece, confirm the bleed amount with your printer. Canva provides a 0.125-inch (3.175 mm) bleed for applicable trimmed print designs, but outside print providers can use different requirements. For packaging, always use the packaging supplier’s dieline and bleed specification instead of assuming Canva’s default applies.
If you are comparing packaging materials before sending artwork to production, BoxNovo’s packaging material choices provides a useful starting point for understanding how material choice fits into the packaging process.
4. Keep Important Content Out of the Danger Zone
Do not place essential information directly against a trim line. Keep logos, phone numbers, addresses, small text, QR codes, and critical product information inside the safe area. This is particularly important for designs with thin borders: small trimming variation can make a border look uneven even when the design is technically centered.
A good rule is simple: let background artwork reach the bleed, but keep information you cannot afford to lose comfortably inside the safe area.
5. Use Images That Can Survive Physical Printing
A picture that looks acceptable at a small size on screen can become visibly soft when printed large. Use the strongest source image available and avoid using screenshots as final print artwork.
For many standard print applications, 300 PPI at the final displayed size is a useful quality target, but it is not a universal rule for every output. Large-format work can use lower effective resolution because viewing distance is greater. The correct target depends on final size, viewing distance, material, and the printer’s requirements.
- Use original high-resolution photography whenever possible.
- Use vector artwork for logos and line art when available.
- Check raster images at their actual placed size, not just at their original file dimensions.
- Do not enlarge a small web image simply because Canva lets you stretch it.
- For packaging, inspect important product photos, logos, and small text at the final physical size.
6. Be Careful With Small Type and Fine Lines
Very thin strokes, hairline rules, and extremely small text can reproduce differently on paper, board, labels, and other substrates. The smaller the type and the more demanding the material or finishing process, the more important a physical proof becomes.
- Avoid placing critical text near folds or cuts.
- Use readable font weights rather than ultra-thin strokes for small copy.
- Test QR codes before the production run.
- Proof small legal, ingredient, contact, or care information at actual size.
7. Export the Canva Design as PDF Print
When a print-ready PDF is the required submission format, Canva’s workflow is Share → Download → PDF Print. Use the print-focused PDF option when it matches your printer’s requirements.
- Open the finished Canva design.
- Check the page size, orientation, and final artwork.
- Select Share.
- Select Download.
- Choose PDF Print from the file type menu.
- Enable Crop marks and bleed if the job requires them or if your design runs to the edge.
- Use Flatten PDF only when your workflow or printer calls for a flattened file.
- Download the PDF.
- Open the exported file and inspect it before sending it to production.
Flattening converts multiple design layers into one static representation. It can help preserve the appearance of layered design elements, but it can also increase file size and is not always required. Follow the printer’s instructions if it specifies whether flattening is wanted.
8. PDF Print vs. PDF Standard: Which Should You Use?
If your printer accepts a Canva PDF and does not specify another format, PDF Print is generally the print-focused starting point. PDF Standard is intended for more general digital sharing and may not provide the same print-oriented controls.
Always follow the printer’s stated file specification if it differs. A printer may request a particular PDF/X standard, packaged source file, color profile, or other production format.
For commercial packaging projects, BoxNovo also has a dedicated packaging print-production options for packaging-related print production.
9. Review Color Before You Print
Screens and physical prints do not display color in the same way. Digital screens use RGB light, while many print processes use CMYK inks or other color systems. Paper stock, coating, ink, press conditions, and finishing can also influence the final appearance.
Do not promise an exact screen-to-print color match simply because the Canva design looks right. If a brand color is critical, ask the printer about its color workflow and proofing options before production.
For custom packaging, color should be discussed with the packaging supplier before final production. If a supplier requires a specific CMYK workflow, spot-color specification, or production PDF standard, follow that requirement rather than assuming Canva’s export is sufficient.
10. How to Print From Canva to Your Printer at Home
If you want to print from Canva on your own printer, download the PDF, open it in a PDF viewer, choose Print, select your printer, and review the paper and scaling options. When exact physical dimensions matter, use 100% or Actual Size if your printer and paper support the required setup.
- Download the design as a PDF.
- Open the PDF in your computer’s PDF viewer.
- Choose Print.
- Select the correct printer.
- Choose the correct paper size and orientation.
- Set scale to 100% or Actual Size when exact dimensions matter.
- Check whether the printer should print one-sided or double-sided.
- Print one test sheet first.
- Measure or inspect the test before printing the remaining copies.
If your printer’s driver uses terms such as Fit, Shrink to Printable Area, Borderless, or Actual Size, do not choose blindly. The correct setting depends on whether you need exact dimensions and whether your printer supports borderless printing on that paper.
11. Can I Print From Canva for Free?
You can design in Canva without paying for a separate Canva printing service and then print the exported file yourself or use a local print provider. However, a Canva design may contain premium elements that require payment before you can download the finished file. Your actual printing cost will also depend on paper, ink or toner, equipment, finishing, quantity, and the print provider.
12. How to Print From Canva at Staples or Another Print Shop
The exact upload and pickup workflow varies by print provider, so use the provider’s current instructions for file submission. The important part is to prepare the artwork before you arrive: correct dimensions, correct orientation, adequate image quality, and the requested PDF or image format.
- Export the highest-quality file that the print provider requests.
- Confirm the finished size before uploading.
- Confirm whether bleed and crop marks are required.
- Ask whether the shop expects RGB, CMYK, or a particular PDF standard.
- Check whether the shop will trim, fold, cut, score, or otherwise finish the piece.
- Order or request a proof when color or exact alignment matters.
- Test a single copy before a large run whenever practical.
If the project is a book or booklet rather than packaging, BoxNovo’s book printing services are another relevant example of how a print project can have requirements beyond simply exporting a Canva file.
13. Printing From Canva for Custom Packaging: What Changes?
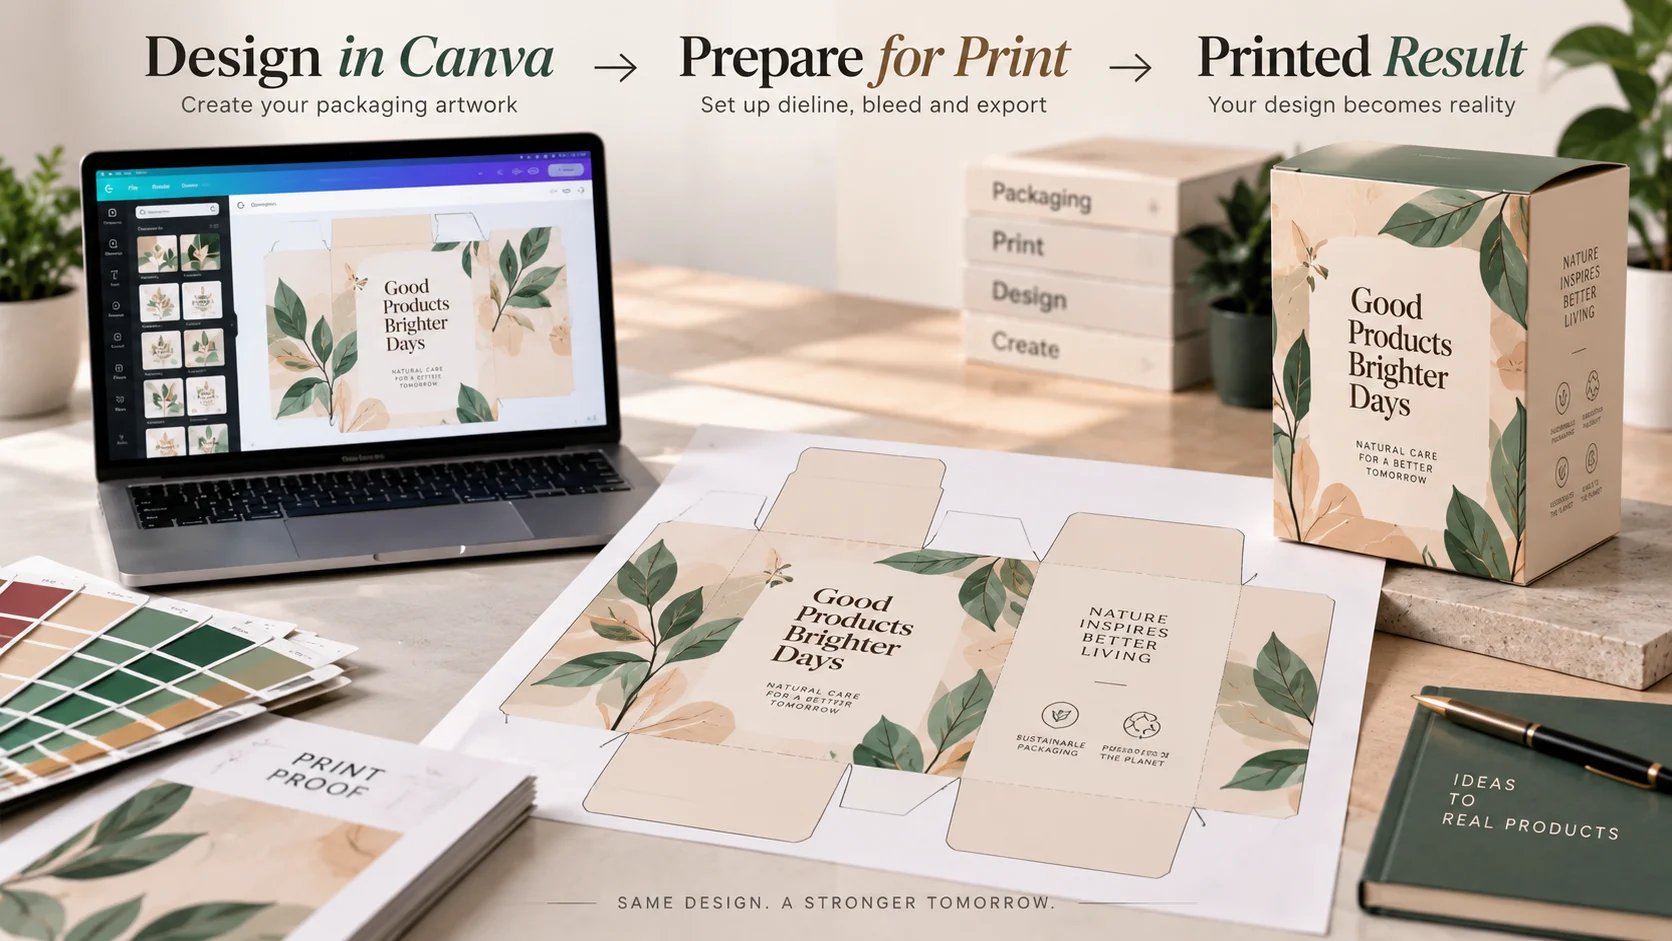
This is where a normal Canva-to-printer workflow becomes a packaging workflow. A flat flyer can be designed on a page and trimmed around its perimeter. A box has structure: panels, folds, flaps, glue areas, cut lines, and sometimes windows, locks, scores, or special finishing.
For custom packaging, ask the supplier for the exact dieline before final artwork. Build the design around that structure and keep critical content away from cuts and folds. If the supplier requires a production file that Canva cannot reliably provide, treat the Canva artwork as the creative source and have the final file prepared or checked by the packaging production team.
You can also review BoxNovo’s broader custom-packaging workflow for broader context on how design, structure, materials, and production fit together.
14. Canva vs. a Packaging Production Workflow
Canva is useful for creating artwork, arranging typography, placing logos, developing color direction, and building visual concepts. A packaging production workflow adds structural and manufacturing checks that a design canvas alone does not replace.
For example, a supplier may need to confirm the dieline, finished dimensions, material, folds, glue areas, print method, finishing, and product fit before production. If the package uses a paperboard structure, reviewing available cardboard packaging choices can also help frame the production discussion.
For general packaging planning, BoxNovo’s packaging materials information can be useful when the artwork needs to be considered alongside the physical material.
15. What to Send a Custom Packaging Supplier
The exact submission package varies by manufacturer. Do not assume every packaging printer wants the same file type. Before production, ask the supplier what it needs and whether it will preflight or rebuild the artwork.
- The final print-ready artwork in the supplier’s requested format.
- The supplier-approved dieline or confirmation that the correct dieline was used.
- A visual reference PDF, JPEG, or PNG if the supplier requests one.
- Color specifications or brand-color references when exact matching matters.
- Any finishing notes, such as coatings, foil, embossing, spot UV, or window placement, when applicable.
- A clear statement of the final box dimensions and product fit.
- Approval of the production proof before the full run.
If you already know the package type and need to compare structural options, BoxNovo’s boxes designed around a specific product are one relevant starting point.
16. Common Canva-to-Print Mistakes
- Starting with the wrong final dimensions.
- Resizing the design after the artwork is complete without checking text, spacing, and image quality.
- Skipping bleed when artwork runs to the edge.
- Placing important text or logos too close to trim lines, folds, or cuts.
- Using low-resolution images or screenshots as final print artwork.
- Assuming screen color will match the physical print exactly.
- Exporting in a format that does not match the printer’s requirements.
- Skipping a test print or proof when size, color, or alignment matters.
- Using a generic Canva page instead of the supplier’s dieline for a custom box.
- Approving a packaging file without confirming the final dimensions and product fit.
17. A Simple Pre-Print Checklist
- ☐ Final dimensions are correct.
- ☐ Orientation is correct.
- ☐ Edge-to-edge artwork extends into the required bleed.
- ☐ Text, logos, QR codes, and other critical content are inside the safe area.
- ☐ Images are high enough quality for their final physical size.
- ☐ Small type and fine lines have been reviewed at actual size.
- ☐ Color expectations have been discussed if exact brand matching matters.
- ☐ The export format matches the printer’s requirements.
- ☐ The PDF has been opened and visually checked after export.
- ☐ A test print or proof has been reviewed when appropriate.
- ☐ For packaging: the correct dieline and box dimensions have been confirmed.
- ☐ For packaging: the production proof has been approved before the full run.
18. When Canva Is Enough—and When You Need Packaging Production Help
Canva can be a very practical design tool for simple printed pieces and for developing the visual direction of branded packaging. It becomes less straightforward when the job depends on complex dielines, multiple structural panels, specialized color requirements, or a printer-specific production standard.
If your project involves a custom box rather than a simple flat printed piece, the safest workflow is to involve the packaging supplier early enough to confirm the structure and production requirements before the artwork is finalized.
19. How BoxNovo Fits Into the Print-Ready Packaging Process
If the final goal is custom packaging rather than a one-off paper print, the artwork is only one part of the project. The packaging format, dimensions, material, print method, finishing, and product fit all affect the final result.
BoxNovo’s custom packaging work is relevant at this stage because a packaging supplier can help translate a finished visual concept into packaging built for the actual product and production method. If you are preparing artwork for custom boxes, review the available box formats before finalizing the packaging file.
For packaging that needs a specific board or structural direction, you can also review cardboard box styles and folding box styles as examples of packaging formats that require artwork to work with the physical construction.
20. Final Answer: How Can I Print From Canva?
For a simple print job, export your finished Canva design as a print-oriented PDF, check the size and orientation, use bleed when the artwork reaches the edge, keep important content inside the safe area, and print the file at the intended scale. For a professional print shop, follow that provider’s exact file specifications. For custom packaging, do not stop at the PDF export: use the supplier’s dieline, confirm the production requirements, review a proof, and approve the final packaging artwork before the full run.
Frequently Asked Questions
Can I print from Canva?
Yes. You can print a Canva design yourself, use Canva’s supported print services, or download a print-ready file for an outside printer. The correct workflow depends on the product and printer requirements.
How do I print from Canva to my printer?
Download the design as a PDF, open the PDF, choose Print, select your printer, set the correct paper size and orientation, and use 100% or Actual Size when the physical dimensions must remain exact. Print a test sheet first.
How do you print from Canva for free?
Design in Canva and download the file, then print it yourself or use a local print provider. Printing is not necessarily free because paper, ink, toner, equipment, or shop charges still apply, and some Canva design elements require payment before download.
How to download and print from Canva?
Open the design, choose Share → Download, select the appropriate PDF format, download the file, open it in a PDF viewer, and print using the correct paper, orientation, and scale settings.
How to print from Canva directly?
Canva provides direct printing or ordering options for supported products and regions. Availability varies by product and location, so check the current Print options in Canva before ordering. Canva also supports downloading a print-oriented PDF for outside printing.
Can I print from Canva to Staples?
You can generally take a downloaded Canva file to a print provider such as Staples, but the provider’s accepted formats, upload process, paper choices, bleed requirements, and finishing options can change. Prepare the file to the provider’s current specifications and confirm the finished size before ordering.
What is the best Canva file for professional printing?
When a printer accepts PDF, PDF Print is usually the appropriate Canva starting point. However, a professional printer may require additional specifications such as a particular PDF/X standard, color space, bleed, or production setup. Always follow the printer’s current requirements.
Do I need bleed when printing from Canva?
You need bleed when artwork extends to the final edge and the printer’s workflow requires a bleed area. Canva provides a 0.125-inch (3.175 mm) bleed for applicable trimmed print designs, but outside printers may use different requirements.
What resolution should images have for printing?
For many standard print applications, 300 PPI at final size is a useful target. It is not universal for every output: large-format printing can use lower effective resolution depending on viewing distance, material, and printer requirements.
Can I use a Canva design for a custom box?
You can use Canva to create packaging artwork or a visual concept, but custom boxes require a structural dieline and supplier-specific production requirements. For complex packaging, have the packaging supplier review the Canva artwork before production.
Why does my Canva print look different from the screen?
Screens use RGB light while printed materials use physical inks or other print processes. Paper, coating, ink, press conditions, and finishing can also affect appearance. Some color variation is therefore normal; critical brand colors should be proofed.
Should I flatten my Canva PDF?
Flattening can help preserve the appearance of layered design elements and fonts, but it can increase file size and is not always required. Follow your printer’s instructions if it specifies whether flattening is wanted.
Conclusion
Printing from Canva is straightforward when the file is prepared for the physical result rather than judged only on the screen. Start with the correct dimensions, check orientation, use bleed for edge-to-edge artwork, keep critical content inside the safe area, choose appropriate image quality, export the required print format, and inspect the file before production.
For custom boxes, add one more rule: start with the packaging supplier’s dieline and confirm the production requirements before finalizing the artwork. That small change turns a generic Canva design into a packaging file that can be reviewed for structure, fit, and print readiness.