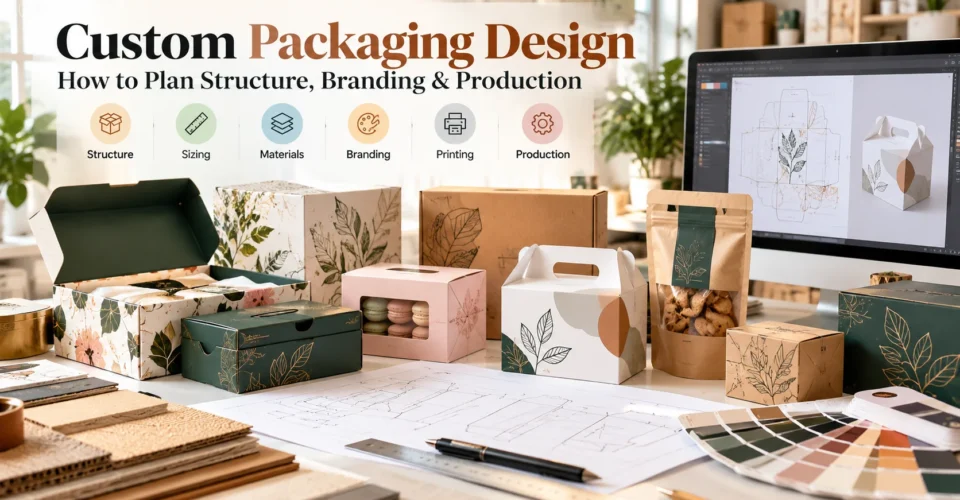
Custom packaging is more than putting a logo on a box. A successful package has to work as a physical object, communicate the brand clearly, fit the product, suit the material and printing process, and move from concept to production without expensive surprises.
That is why the strongest packaging projects are planned in a deliberate order. Start with the product and the job the package must perform. Then define the structure and dimensions, select the material, develop the dieline, build the visual identity, prepare production artwork, test the physical package, and only then approve the manufacturing run.
This guide explains how to plan custom packaging design from the first brief through production, with a practical framework for structure, branding, materials, artwork, printing, finishing, prototyping, quality control, and delivery.
What Is Custom Packaging Design?
Custom packaging design is the process of developing a package around a specific product, brand, customer experience, and production requirement instead of forcing the product into a generic format.
It combines two connected disciplines:
- Structural design: the physical form, dimensions, panels, folds, closures, inserts, openings, and construction.
- Graphic design: the visual system applied to that structure, including typography, color, imagery, logos, product information, hierarchy, and finishing direction.
The two should not be treated as separate projects. A graphic element may need to move because of a fold. A material may change how a color appears. A window may reduce the available print area. An insert may change the usable interior space. A finishing process may affect how much detail can be reproduced.
For a broader view of how product, structure, materials, printing, and presentation fit together, review BoxNovo’s complete packaging planning guide.
Start With the Product, Not the Artwork
One of the most common packaging-design mistakes is beginning with the front panel before defining what the package must physically do.
Before opening a design application, document:
| Requirement | What to define | Why it matters |
|---|---|---|
| Product | Shape, dimensions, weight, fragility and presentation requirements | Determines the basic packaging geometry and protection needs |
| Quantity | One product, multipack, assortment or multiple SKUs | Affects layout, inserts, box size and production planning |
| Use | Retail, local delivery, ecommerce, gifting, subscription or another channel | Changes handling, presentation and protection requirements |
| Brand | Brand identity, colors, typography, photography and messaging | Creates the visual system that the package must carry |
| Information | Product name, variant, instructions, warnings, barcode and other applicable information | Prevents late artwork changes and crowded panels |
| Production | Material, print process, finishes, quantity and manufacturing constraints | Determines what can be produced consistently |
The result should be a short packaging design brief. A clear brief is much easier to review than a collection of screenshots, mood boards and loosely defined ideas.
The Custom Packaging Design Workflow
A practical design-to-production sequence is:
Brief → Product → Structure → Size → Material → Dieline → Artwork → Printing → Finishing → Prototype → Test → Production → Quality Control → Delivery
The sequence can vary by packaging format, but the principle is consistent: decisions that affect the physical package should be resolved before final artwork is locked.
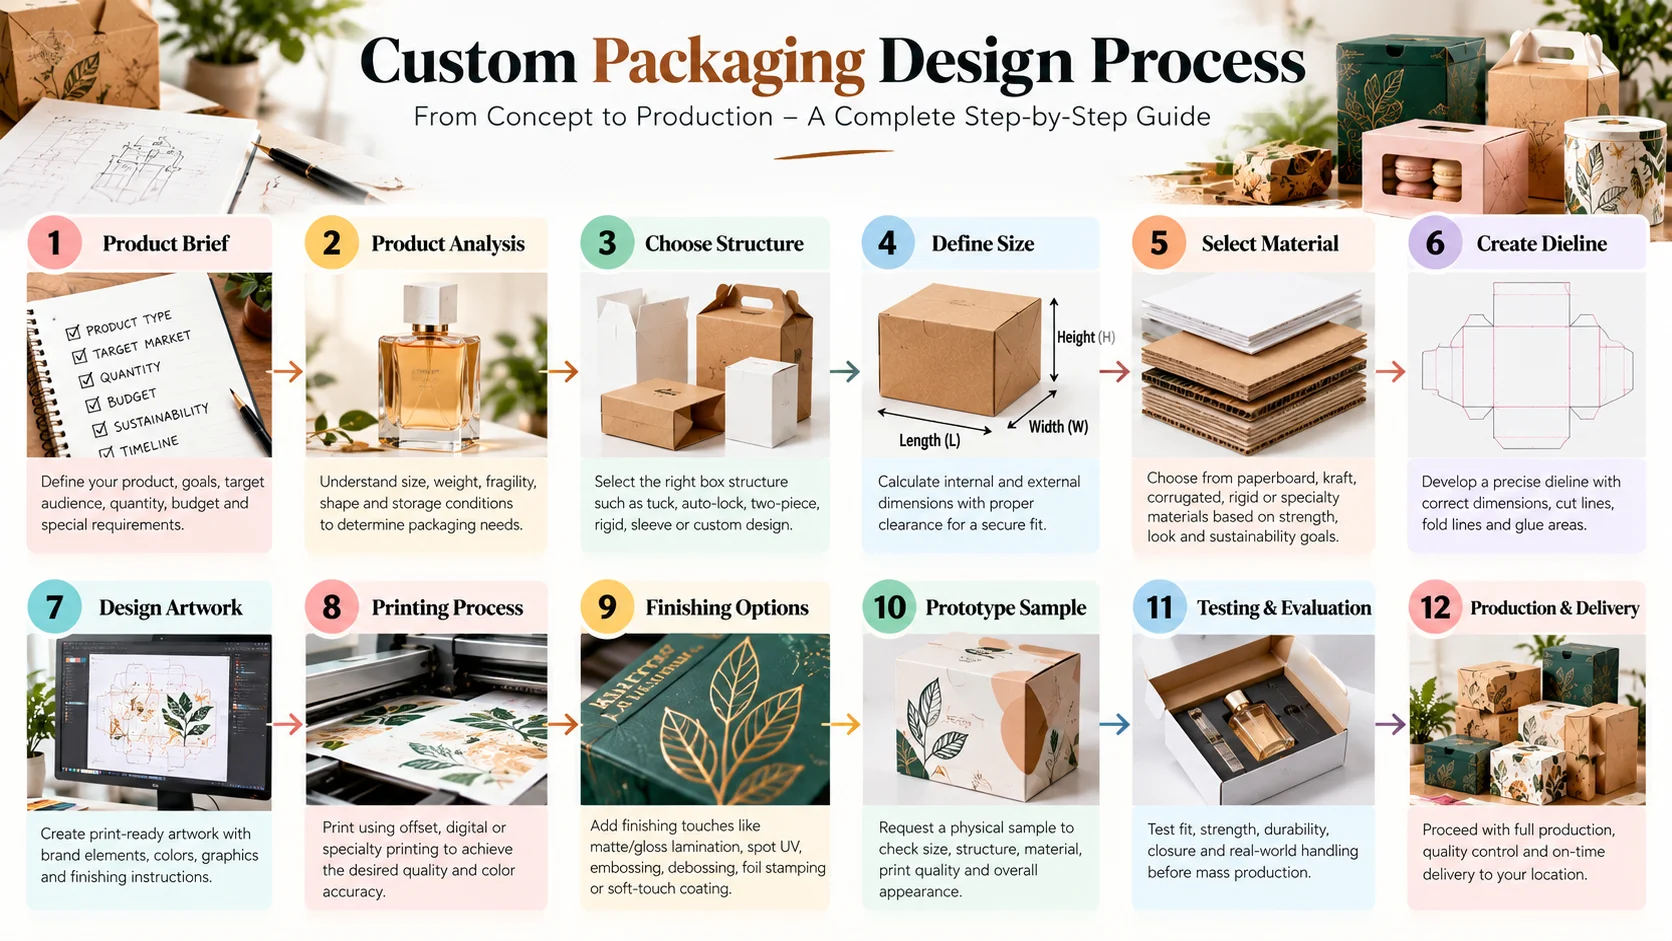
1. Define the Packaging Brief
Start by writing down the packaging objective in plain language. What is the package supposed to accomplish?
- Protect the product during normal handling.
- Create a recognizable retail presentation.
- Improve the unboxing experience.
- Fit an ecommerce shipping workflow.
- Present a premium or giftable product.
- Organize several components or variants.
- Carry product information clearly.
Also record the intended quantity, target dimensions, sales channel, destination, expected handling, artwork status and any known production requirements.
If you are not sure which package family fits the application, start with BoxNovo’s custom packaging options and use the product requirements to narrow the structure.
2. Measure the Product
Measure the actual finished product rather than designing around an approximate product name. Record the maximum usable length, width and height, including features that affect fit.
For irregular products, note:
- the widest point;
- the tallest point;
- handles, caps, closures or protrusions;
- fragile or pressure-sensitive areas;
- required orientation;
- boards, trays, sleeves or other components;
- how the product is inserted and removed.
Do not assume that the product’s outside dimensions are automatically the correct finished box dimensions. Interior clearance, material thickness, structure and inserts all affect the final package.
When moving from product measurements to a finished box specification, use BoxNovo’s box sizing guidance as a supporting reference.
3. Choose the Right Structure
Structure determines how the package opens, closes, displays the product, uses material, and behaves during handling. The right structure depends on the product and use case rather than on appearance alone.
| Structure direction | Useful when | Key design questions |
|---|---|---|
| Folding carton | Retail and compact product packaging | How should it fold, close and display? |
| Mailer-style structure | Direct-to-consumer and shipping-oriented presentation | How will it handle opening, carrying and delivery? |
| Rigid construction | Premium presentation and gifting | How should the opening experience and interior support work? |
| Window structure | When product visibility is important | Where should the opening sit and how does it affect the print area? |
| Die-cut structure | Distinctive shapes, openings or product-specific geometry | Which cuts, folds and internal features are necessary? |
| Tray-and-sleeve or insert system | Products needing organization or presentation layers | How do the components work together when loaded? |
BoxNovo’s packaging style library is useful when comparing structural directions before the final format is selected.
4. Set the Finished Dimensions
Dimensions should describe the package you actually intend to manufacture. Confirm whether a supplier is quoting internal, external, finished, or flat dimensions before approving the specification.
For a box, the basic planning questions are:
- What must fit inside?
- How much functional clearance is needed?
- Will an insert, tray, divider or board consume interior space?
- Does the product need to be removed by hand?
- Will the package sit inside a shipping carton, mailer or retail display?
- Does the finished package need to fit a storage or fulfillment constraint?
A small difference in dimensions can affect material use, printing area, insert geometry and shipping efficiency, so do not finalize the artwork until the structural dimensions are settled.
How to Choose Packaging Materials
Material selection should follow the physical job of the package and the desired presentation. Consider strength, stiffness, surface, printability, finish compatibility, product environment, handling and the final packaging format together.
| Material direction | Common design role | Considerations |
|---|---|---|
| Paperboard / cardboard | Printed cartons and product boxes | Surface quality, stiffness, print coverage and finishing compatibility |
| Kraft | Natural-looking and brand-forward packaging | Surface appearance, print behavior, structure and intended use |
| Corrugated | Shipping and protective packaging | Flute construction, strength, stacking and transit requirements |
| Rigid board | Premium presentation and gift packaging | Thickness, construction, wrap, inserts and opening experience |
BoxNovo’s material selection guide can help organize the material decision before artwork is finalized.
For more specific material references, see the cardboard packaging options, kraft packaging options, corrugated packaging options, and rigid packaging options available from BoxNovo.
What Is a Packaging Dieline?
A dieline is the technical layout used to define the physical geometry of a package before it is cut and folded. Depending on the structure, it can show cut lines, fold or crease lines, glue areas, openings, panels and other production references.
The dieline is where the physical package and the graphic design meet.
Before artwork is finalized, check:
- panel orientation;
- front, back, side, top and bottom surfaces;
- cut and fold locations;
- glue or adhesive areas;
- window openings;
- insert or locking features;
- artwork bleed and safe areas according to the printer’s specification;
- barcode, product information and other critical content placement.
Do not resize or redraw an approved production dieline simply to make artwork fit. If the structure changes, the artwork should be reviewed against the updated production file.
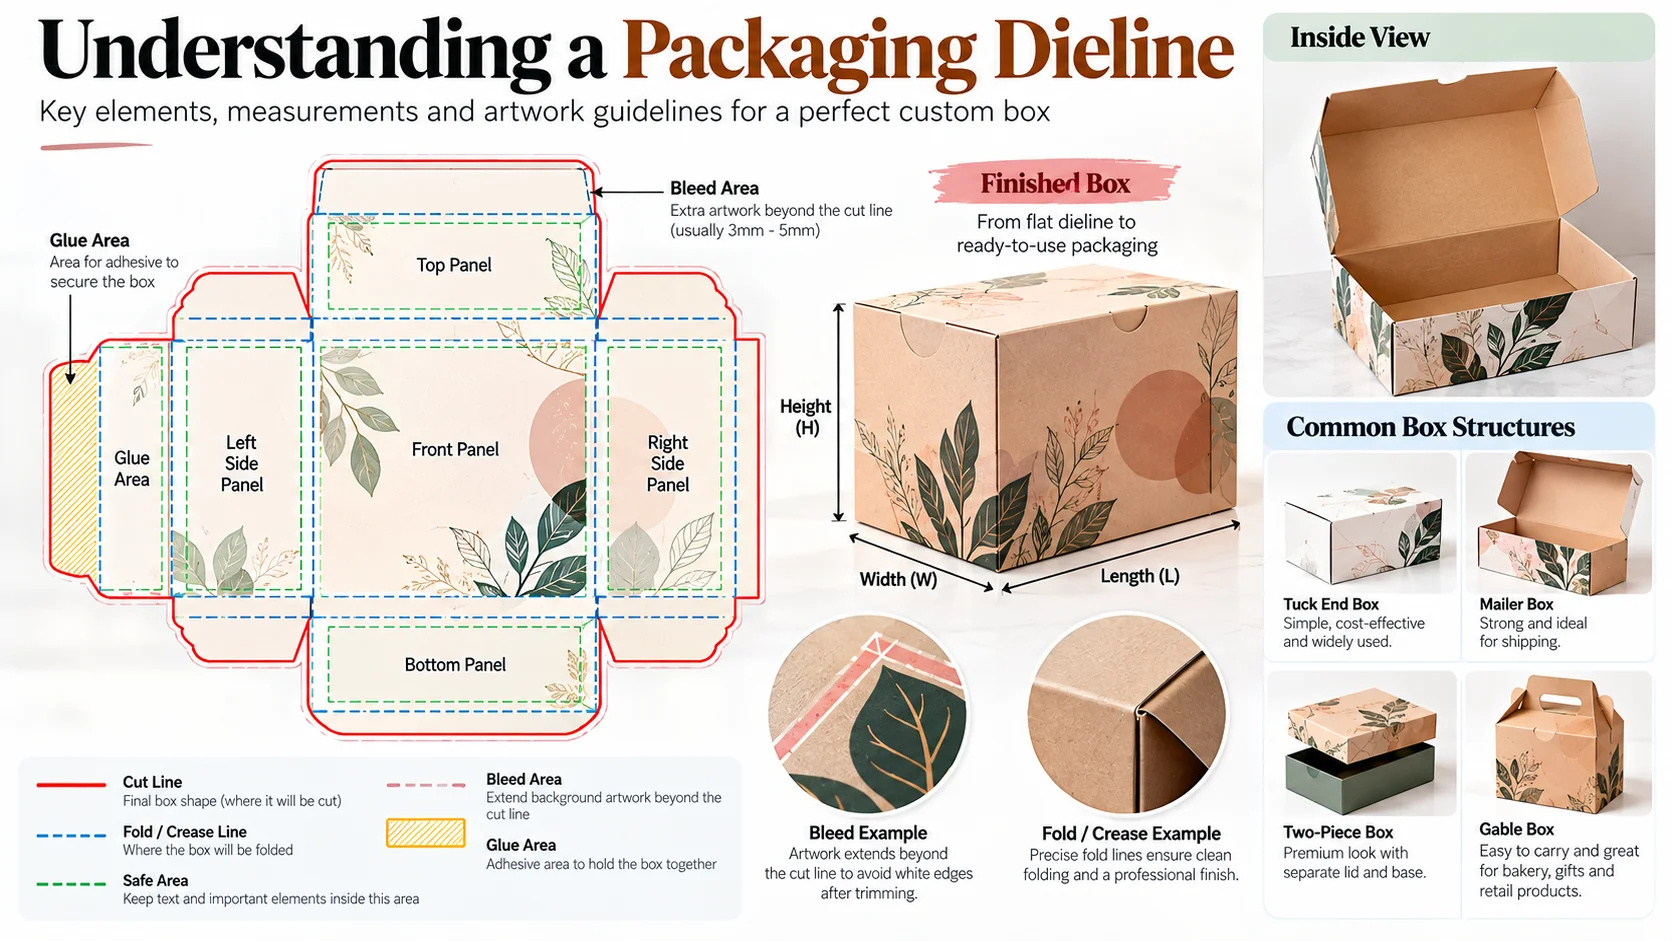
Bleed, Safe Area and Fold Awareness
Artwork that reaches a cut edge generally needs the printer’s specified bleed so small cutting variation does not expose an unprinted edge. Important text and logos should remain inside the specified safe area and away from folds, cuts, glue zones, windows and closures.
Exact bleed, color and file requirements should come from the manufacturer or printer for the specific production process. Do not treat a generic online value as a universal production specification.
Build the Brand System Before Decorating the Box
A strong branded package is not created by placing the logo as large as possible on the front. The design should establish a visual hierarchy that helps the customer understand the brand and product quickly.
What the Main Panel Should Communicate
The primary panel usually needs a clear identity and a clear product message. Depending on the category, that may include the brand, product name, variant, short descriptor or another important piece of information.
Supporting information can move to other panels so the main surface remains easy to scan.
| Visual element | Planning question |
|---|---|
| Logo / brand name | Can the brand be recognized quickly? |
| Product name | Is the product obvious without decoding the artwork? |
| Variant | Can different SKUs be distinguished consistently? |
| Color system | Does the palette support recognition and reproduction? |
| Typography | Is the hierarchy readable at actual package size? |
| Imagery | Does photography or illustration support the product story? |
| Supporting copy | Is every line useful enough to earn space on the package? |
For packages that use labels alongside printed boxes, BoxNovo’s label design guidance can help determine which information belongs on the label, box, or supporting component.
Design the Packaging as a System
Packaging rarely consists of one isolated surface. A box may work with a label, insert, sleeve, tray, seal, thank-you card, instruction card or shipping carton.
Before finalizing the design, decide what job each component performs.
| Component | Primary role |
|---|---|
| Outer package | Protection, presentation and primary brand communication |
| Label | Identification, variable information or functional messaging |
| Insert | Instructions, education, care information or post-purchase messaging |
| Sleeve | Additional branding or presentation layer |
| Seal / sticker | Closure, identification or short message |
| Shipping carton | Secondary protection and logistics function |
This system approach prevents the common mistake of trying to place every message on one front panel.
Choose Printing and Finishing After the Structure Is Clear
Printing should support the packaging design rather than dictate the structure. The appropriate print process depends on the material, quantity, artwork, color requirements, package format and production method.
Potential design considerations include:
- full-color artwork;
- limited-color or spot-color branding;
- interior printing;
- matte or gloss appearance;
- soft-touch effects;
- foil stamping;
- embossing or debossing;
- spot effects;
- specialty papers or textured surfaces.
Not every finish belongs on every package. A finish should have a clear purpose: improve readability, reinforce brand positioning, create tactile distinction, protect a surface where appropriate, or emphasize a specific visual element.
If artwork is being prepared in Canva, BoxNovo’s Canva print-preparation guidance can help you review the design before handing it into production.
Prepare Artwork for Production
Before a production file is approved, complete a structured preflight rather than relying on a visual glance.
Artwork Preflight Checklist
- Correct package size and current dieline used.
- Correct SKU, product name and variant.
- All required copy checked and proofread.
- Colors prepared according to the printer’s requested workflow.
- Images and graphics meet the production requirements.
- Bleed and safe areas follow the printer’s current specification.
- Important information avoids folds, cuts, glue zones and windows.
- Barcodes and QR codes are tested at the intended size where applicable.
- Finishing layers are clearly identified when required.
- Artwork orientation is correct across every panel.
- Linked assets and fonts are handled according to the printer’s file requirements.
- Final proof is reviewed before production approval.
Use a Physical Prototype Before Full Production
A digital mockup can show the overall concept, but it cannot answer every physical packaging question.
A physical sample can reveal:
- whether the product actually fits;
- whether the closure works as expected;
- whether the product moves too much;
- whether an insert is positioned correctly;
- whether important artwork lands on the intended panel;
- whether the opening sequence feels practical;
- whether the package can be carried and handled comfortably;
- whether the finished material and printing create the intended appearance.
Use the actual product whenever possible. If the package contains an insert, tray, board or other component, test the loaded configuration rather than the empty box.
Test the Package for Its Real Use
Testing should reflect how the package will actually be handled. A package intended for retail display may need different checks from one sent directly through ecommerce fulfillment.
| Test | Question |
|---|---|
| Fit test | Does the finished product sit correctly inside the package? |
| Closure test | Does the package open and close reliably? |
| Movement test | Does the product shift more than intended? |
| Carry test | Can the loaded package be picked up and carried as intended? |
| Stacking test | Does the package remain suitable for the expected storage or display arrangement? |
| Opening test | Can the customer understand and use the opening sequence? |
| Delivery simulation | Does the package remain suitable for the expected handling path? |
| Artwork inspection | Are folds, cuts, windows and finishing aligned with the approved design? |
For demanding applications, the appropriate formal packaging test method should be selected for the product, package and distribution environment rather than assuming one generic test applies to every project.
How Custom Packaging Design Affects Production Cost
Packaging cost is not determined by artwork alone. The final specification can involve dimensions, material, structure, quantity, printing coverage, finishes, windows, inserts, tooling, assembly and logistics.
| Design decision | Potential production impact |
|---|---|
| Large dimensions | More material and potentially different packing or shipping requirements |
| Complex structure | More cutting, folding, gluing or assembly considerations |
| Special insert | Additional component and assembly requirements |
| Window | Additional converting and material considerations |
| Premium finish | Additional finishing or production steps |
| Many SKU versions | More artwork, proofing and production coordination |
| Low quantity | Fixed setup or tooling costs can represent a larger share of the project |
The goal is not to remove every design feature. It is to understand the production consequence of each feature before it becomes part of the final specification.
Custom Packaging Ideas: Where Creativity Actually Helps
Creative packaging design is most useful when it improves recognition, usability, presentation or product protection.
Ideas worth exploring include:
- an opening sequence that reveals the product in stages;
- a window positioned to showcase the most important product feature;
- an insert that organizes multiple components;
- interior printing that creates a secondary brand moment;
- a sleeve that changes seasonal artwork without replacing the core package;
- consistent structural rules across multiple SKUs;
- a limited finish applied only to the most important brand element;
- packaging that doubles as a display or presentation format where appropriate.
Creativity should still follow the physical constraints of the package. The most effective packaging ideas are the ones that can survive the transition from concept to a repeatable manufactured product.
Common Custom Packaging Design Mistakes
Designing the Artwork Before the Structure
A beautiful front panel cannot compensate for a box that does not fit, close or manufacture correctly.
Using Product Dimensions as Final Box Dimensions
The product, clearance, board or tray, insert, material and structure all need to be considered together.
Ignoring the Fold and Glue Areas
Artwork that looks correct on a flat screen can land in the wrong place once the package is folded.
Putting Too Much Information on the Front
Use hierarchy and assign information to the panels or components where it is easiest to read.
Approving a Render Without Testing a Sample
A digital render is useful for concept review, but a physical sample is the practical check for fit, construction and real-world presentation.
Adding Finishes Without a Purpose
Finishes should support the design rather than become decoration that increases complexity without improving the customer experience.
Forgetting the Delivery Channel
Retail presentation, local delivery and ecommerce fulfillment can create different packaging requirements. Define the actual journey before locking the package.
Custom Packaging Design Checklist
Before approving a production-ready package, work through this checklist:
- Product dimensions and weight documented.
- Packaging purpose and sales channel defined.
- Required information collected.
- Box structure selected.
- Finished dimensions confirmed.
- Material selected for the application.
- Dieline reviewed against the actual product.
- Brand hierarchy established.
- Artwork built on the correct production file.
- Bleed, safe areas, folds and glue zones checked.
- Printing and finishing requirements confirmed.
- Physical prototype reviewed.
- Loaded package tested in its intended use case.
- Final artwork proofread and approved.
- Production specifications documented for future reorders.
Custom Packaging Design for Multiple SKUs
If a brand has several products, do not design every package independently. Build a packaging system.
Keep selected rules consistent across the family:
- logo placement;
- primary typography;
- core color palette;
- product-name hierarchy;
- information placement;
- photography or illustration direction;
- finish language;
- structural logic where practical.
Then allow product-specific dimensions, variants, images and supporting information to change within those rules.
This approach makes a product family easier to recognize while reducing unnecessary redesign work whenever another SKU is introduced.
How to Brief a Custom Packaging Manufacturer
A manufacturer can work more accurately when the initial request contains the information needed to evaluate the project.
| Include | Example information |
|---|---|
| Product | What is being packaged and how it is presented |
| Dimensions | Finished product length, width, height or diameter |
| Quantity | Approximate production quantity and number of SKUs |
| Structure | Preferred style or a description of the opening and closing experience |
| Material | Preferred material or performance/presentation requirements |
| Printing | Artwork coverage, colors and interior/exterior requirements |
| Finishing | Any desired foil, embossing, coating or other finish |
| Components | Insert, tray, divider, window, sleeve, label or other elements |
| Use case | Retail, ecommerce, local delivery, gifting, subscription or other use |
| Artwork | Existing artwork, concept, or design assistance needed |
| Sample | Whether a physical prototype is required before production |
| Destination | Where the finished packaging will be used or delivered |
For brands that need packaging developed around a specific product rather than a generic format, BoxNovo’s custom product box solutions provide another relevant starting point.
Final Takeaway
The strongest custom packaging design projects do not begin with decoration. They begin with a clear understanding of the product and the job the package must perform.
Define the brief. Measure the product. Choose the structure. Confirm the dimensions. Select the material. Build the dieline. Develop the brand system. Prepare the production artwork. Select printing and finishing. Test a physical sample. Then approve production.
That structure-first, production-aware approach gives creative packaging ideas a better chance of becoming packaging that works in the real world—not just packaging that looks good on a screen.
Frequently Asked Questions About Custom Packaging Design
What is custom packaging design?
Custom packaging design is the process of developing a package around a specific product, brand, customer experience and production requirement. It can include structural design, dimensions, materials, dielines, artwork, printing, finishing, inserts and other packaging components.
How do I start a custom packaging design project?
Start by documenting the product, dimensions, quantity, sales channel, packaging purpose, brand requirements and any protection or presentation needs. Then use those requirements to select the structure, material and dimensions before developing final artwork.
Should packaging structure or graphic design come first?
The physical structure should be established before final artwork is locked. The approved dieline determines the panels, folds, cuts, openings and other physical boundaries that the graphics must work within.
What is a packaging dieline?
A packaging dieline is a technical layout showing the physical geometry of a package, including relevant cut, fold, glue and opening areas. It provides the structural foundation for production artwork.
How do I choose packaging material?
Choose material based on the product, required protection, box structure, presentation, printing, finishing, handling environment and intended sales or delivery channel. There is no single material that is correct for every packaging project.
Do I need a physical packaging sample?
A physical sample is valuable whenever fit, construction, closure, inserts, presentation or handling needs to be verified before production. Test the sample with the actual product and components whenever possible.
What should I send a packaging manufacturer?
Provide the product details, finished dimensions, quantity, structure preference, material direction, artwork status, printing and finishing requirements, inserts or other components, intended use and destination. The more complete the specification, the easier it is to evaluate the packaging accurately.
Can custom packaging design support multiple products?
Yes. A packaging system can establish consistent rules for logo placement, typography, colors, information hierarchy and visual style while allowing dimensions and product-specific content to change for each SKU.