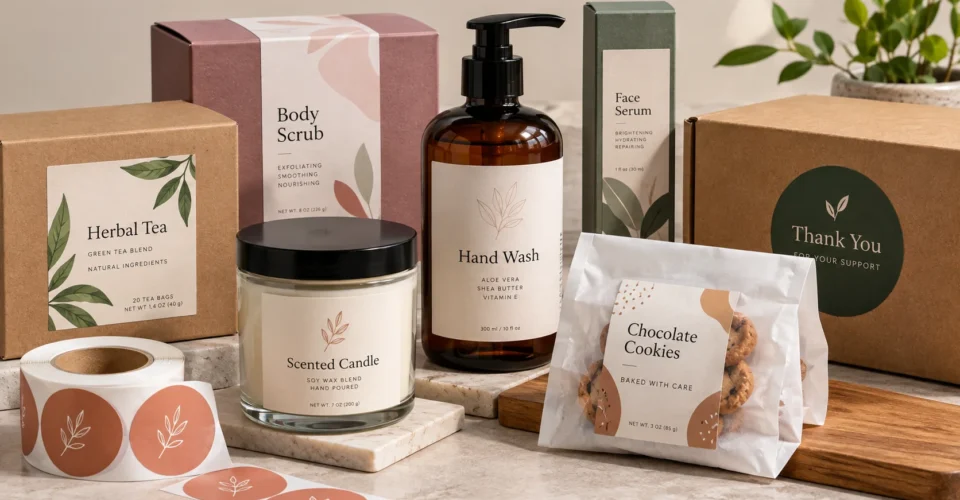
Good product label design does more than make a package look polished. It tells shoppers what the product is, establishes brand recognition, organizes important information, and has to work under real conditions such as handling, storage, shipping, moisture, and repeated use.
The practical approach is to design the label and the package together. Start with the product and usable packaging surface, decide what information deserves attention first, choose the format and material for the environment, then prepare and test the artwork before the full run.
What Is Product Label Design?
Product label design is the planning and visual arrangement of branding, product information, graphics, and functional details on a label attached to a product or its packaging. It combines visual communication with physical production requirements such as dimensions, shape, material, adhesive, finishing, and print setup.
Label Design vs. Label Printing
Label design is the planning stage; label printing is the production stage. They should be considered together because material, finish, die shape, color process, and application method can affect what is practical in the final artwork.
Why Labels Are Part of the Packaging Experience
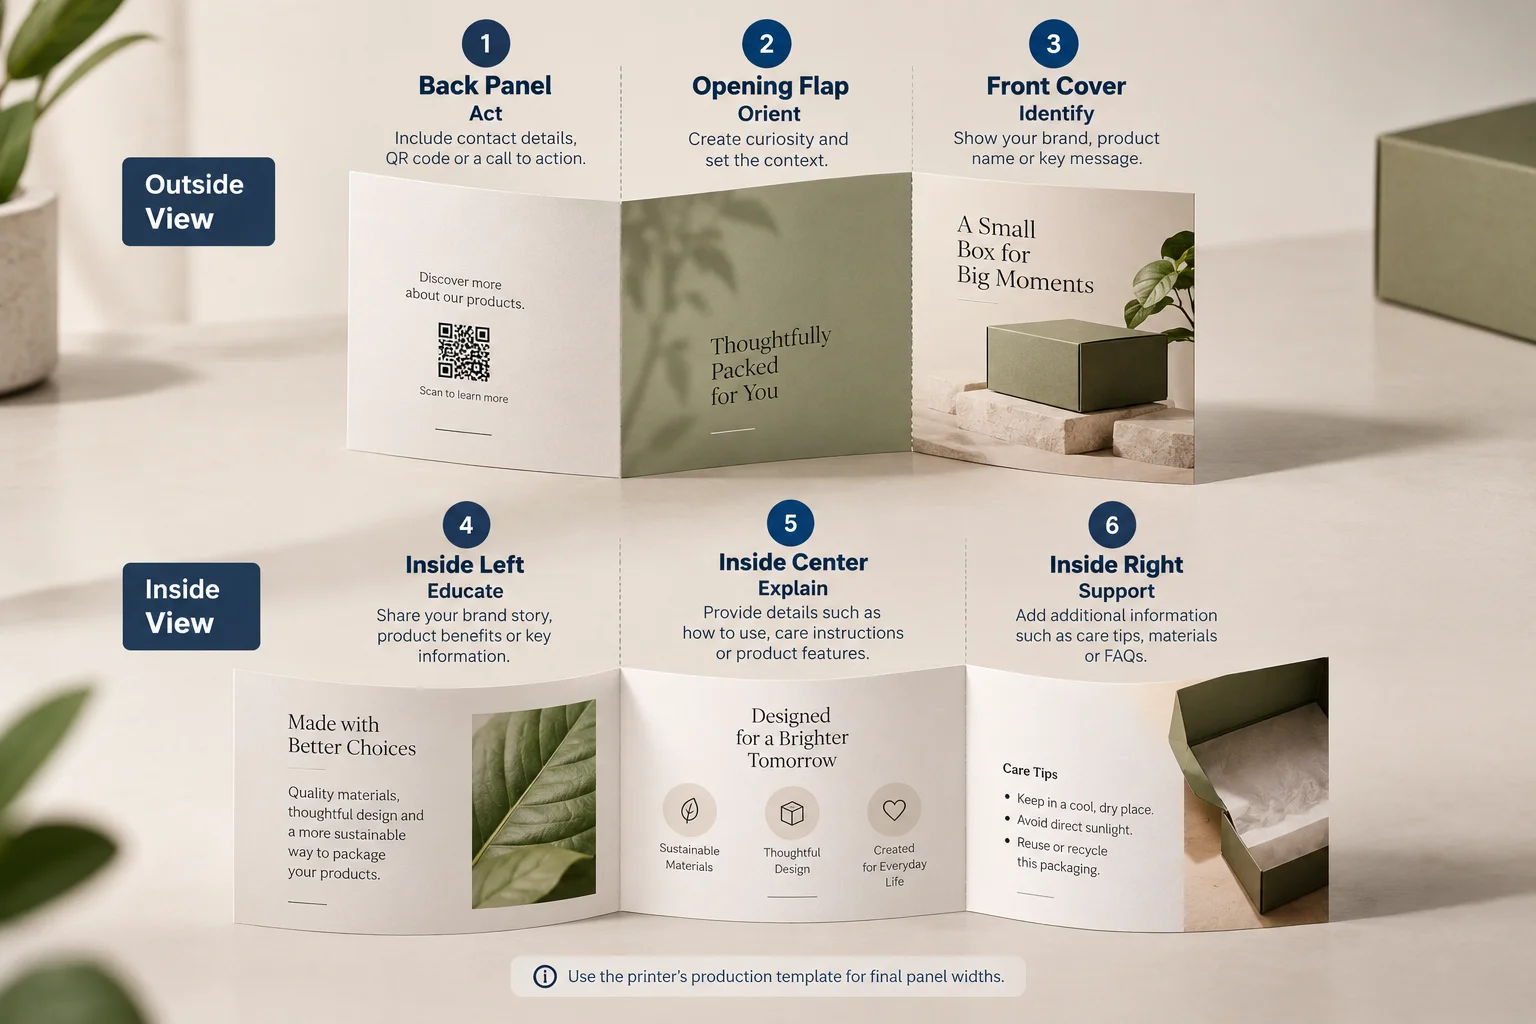
A label often shares the communication job with the box, pouch, carton, insert, or other packaging component. On a small package, the label may carry product identity while the box or insert provides room for instructions, brand storytelling, or supporting information.
For brands planning the whole physical presentation rather than a sticker in isolation, the product packaging planning guide is a useful next step because it connects the product, package structure, and customer-facing presentation.
What Should a Product Label Include?
There is no single universal checklist for every product. Required information varies by product category and market, so collect all applicable requirements before finalizing the visual hierarchy.
| Information Group | Typical Examples | Design Priority |
|---|---|---|
| Identity | Brand, logo, product name | High |
| Product details | Description, variant, flavor, size | High |
| Quantity | Net weight, volume, count where applicable | High |
| Usage | Directions, storage, care | Medium to high |
| Safety / regulatory | Warnings, allergens, required disclosures | High; category-dependent |
| Traceability | Barcode, batch/lot, date information | Functional |
| Brand support | Claims, certifications, short brand message | Selective and substantiated |
| Digital access | QR code or short URL | Optional; test before production |
Brand and Product Identification
The front-facing hierarchy should make the brand and product easy to identify. A shopper should not have to decode decorative graphics before understanding what the product is.
Product Label Information Beyond the Front
Ingredients, instructions, warnings, storage information, certifications, and traceability details can overcrowd a small label. Before shrinking the typography, decide whether some content belongs on a back label, secondary package, box panel, or packaging insert.
When the package needs more room for education or storytelling, a well-planned six-panel packaging brochure format can handle information that would otherwise make the product label too dense.
How to Structure Information on a Product Label
A strong hierarchy answers the shopper’s questions in order: What is this? Which product or variant is it? What matters most about it? What additional information do I need? Not every element deserves equal visual weight.
A Practical Three-Level Hierarchy
- Primary: brand, product name, or the single most important identification element.
- Secondary: variant, benefit, flavor, size, or short descriptor.
- Supporting: ingredients, instructions, warnings, barcode, certification, contact information, and other required or functional details.
Typography, Contrast and White Space
Typography should help the reader scan the label. Use a small number of type families, clear size and weight differences, strong contrast, and enough space around information groups. White space is useful navigation, not wasted area.
How to Choose the Right Label Size
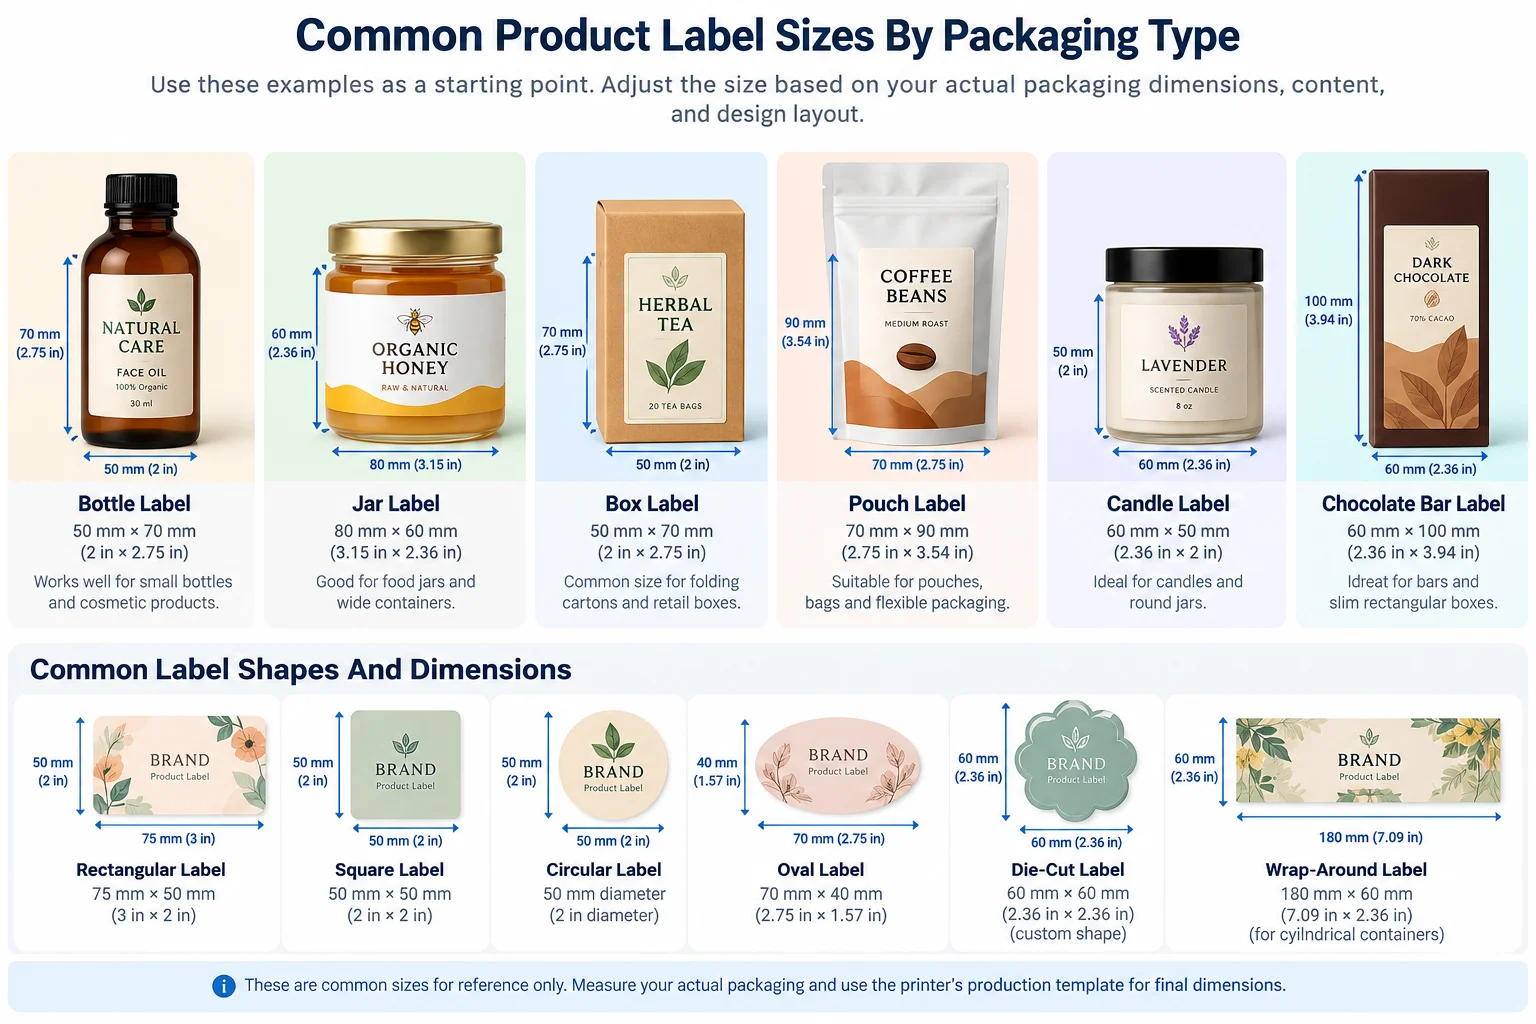
Choose label dimensions from the actual packaging surface, not from a generic template. Measure the usable area and account for curves, shoulders, seams, closures, texture, and information volume.
A Simple Label Measurement Workflow
- Measure the usable width and height of the intended label area.
- Identify surfaces that should remain free of labels, such as seams, closures, corners, or sharp transitions.
- Decide whether the label will be front-only, front-and-back, wrap-around, or a seal.
- Estimate required and optional content.
- Set the artwork area and safe area using the printer’s production specification.
- Print a physical proof at actual size and apply it to the real package before approving the full run.
Label Size Is a Packaging Decision
If the label is going on a custom box, measure the usable box panel rather than the outside box dimensions. A label that fits the panel may still collide with a fold, closure, window, edge, or other printed element.
Before finalizing artwork, use the packaging dimension planning resource to think through the finished box size and usable surfaces. This is especially important when the label needs to sit on a lid, front panel, side panel, or closure.
Common Product Label Shapes and Formats
| Format | Useful When | Watch For |
|---|---|---|
| Rectangle | Most general product-label applications | Corners, seams and curves |
| Square | Short, centered information | Limited width for long copy |
| Circle | Lids, caps, seals and compact branding | Less efficient for long text |
| Oval | Decorative or heritage-style packaging | Reduced usable area near ends |
| Custom die-cut | Distinctive brand shapes | Higher production and application complexity |
| Wrap-around | Front + side/back information | Seam, overlap, circumference and curvature |
Label Design for Different Packaging Types
Bottles and Jars
Measure the straight labelable area first. Keep critical text away from strong curvature. Consider front and back labels when information volume is high.
Pouches and Bags
Flexible packaging can move during handling. Avoid folds, gussets and seals, and match the label construction to the substrate and environment. For brands selling packaged goods online, the label should also remain legible in product photography.
Folding Cartons
A carton provides multiple panels, so a label does not need to carry every message. It can instead handle variable information, SKU identification, seals, seasonal messaging, or limited-run branding.
Rigid Boxes
Rigid boxes offer defined presentation surfaces. A small label on a lid, side, or closure can complement printed graphics without overwhelming the main surface.
For premium presentation, the label can also work alongside rigid packaging formats for premium presentation rather than being forced to carry the entire visual identity by itself.
Ecommerce Mailers
Consider product presentation and shipping conditions together. Keep shipping-related markings separate from customer-facing product messaging where appropriate.
Product Label vs. Directly Printed Packaging
| Approach | Best Fit | Strength | Trade-off |
|---|---|---|---|
| Product label | Flexible SKUs and updates | Easy to change | Adds an application step |
| Direct box printing | Stable brand presentation | Integrated appearance | Changes can affect the whole package run |
| Packaging insert | Education and supporting information | High information capacity | Needs space and an extra component |
| Label + printed box | Layered branding | Combines permanent and flexible messaging | Requires coordinated production |
When a Label Makes More Sense
A label is useful when information or branding needs to change without changing the whole package, or when the label performs a functional job such as sealing or identification.
When Direct Box Printing Makes More Sense
Direct printing can make sense when the package itself is a major brand surface and the artwork is stable enough to justify printing it directly.
When to Use Both
A box can carry stable brand and product presentation while a label handles variable or functional information. This can work well for multiple flavors, sizes, colors, or seasonal versions.
How to Choose Label Materials
Choose material from the physical environment first and aesthetics second. Paper can suit dry products and tactile presentations. Film-based materials can be useful where moisture, oil, condensation, or repeated handling is expected. Confirm the final combination with the printer.
For a broader comparison of packaging substrates, review the guide to choosing packaging materials for different applications. The same principle applies to labels: material choice should follow the physical use case rather than appearance alone.
| Material Direction | Common Use | Key Consideration |
|---|---|---|
| Paper | Dry products and tactile presentation | Moisture and abrasion resistance |
| Synthetic film | Moisture and repeated handling | Substrate compatibility |
| Clear film | No-label-look effects | Ink opacity and white underprint |
| Specialty / textured stock | Premium presentation | Print and finishing compatibility |
How to Choose a Label Finish
Matte can reduce glare and create a softer appearance; gloss can emphasize color and contrast. Laminated or protected finishes may improve resistance to moisture or abrasion. Test the actual combination instead of judging only from a screen mockup.
Adhesive and Application Considerations
Adhesive is part of label performance. Consider substrate, surface texture, temperature, moisture, application method, and whether the label must be removable or permanent.
- Hand and machine application can require different supply formats.
- Machine application may require roll direction, core specifications and spacing.
- Labels bridging closures or two surfaces should be tested through the opening process.
- Cold, wet, oily or frequently handled products may require different material and adhesive combinations.
- Test the actual label on the actual packaging before a large run.
Food Label Design: Plan Information Before Graphics
Food label design requires more than visual appeal. Ingredients, allergens, net quantity, nutrition information, dates, storage information, and other details may apply depending on the product and market. Do not treat a competitor package as a complete legal checklist. Confirm requirements for the exact product and market with the applicable authority or qualified regulatory adviser.
For U.S. food products, the FDA Food Labeling Guide is a useful starting point, but the exact requirements depend on the product and situation.
Cosmetics and Personal Care Labels
Small containers can have more information than the front surface can comfortably carry. Use the label for essential identification and applicable required information, and consider the secondary package or insert for additional education where appropriate. Moisture and repeated handling also affect material and finish selection.
When the label is part of a broader presentation for beauty or personal-care products, the custom packaging options for cosmetic products can help you think beyond the label surface and coordinate the complete presentation.
Label Design for Ecommerce Packaging
Ecommerce packaging is experienced through product photography and physical unboxing. A label should remain legible in product images, survive shipping conditions, and work with the box’s branding rather than compete with it. Test QR codes from realistic viewing conditions and confirm their destinations work on mobile.
For brands shipping individual products directly to customers, consider how the label works with the outer package. A retail-ready packaging format can provide a larger branded surface while the label handles product-specific or variable information.
How to Design a Label for a Custom Box
Start with the box panel rather than the sticker. Identify finished panel dimensions, folds, edges, closures, windows and other graphics. Then decide whether the label is the primary branding surface, a variable-information layer, a seal, or a supporting element.
When the package includes an insert, the information architecture can be divided across the system: the label identifies the product, the box establishes brand and product presentation, and the insert carries deeper instructions, education, or post-purchase messaging.
Before committing to a label-only approach, review the complete packaging-system approach to see how structure, materials, printed surfaces, and supporting pieces can work together.
Label Design vs. Packaging Inserts: What Information Goes Where?
| Packaging Element | Best Role | Typical Content |
|---|---|---|
| Product label | Immediate identification and essential information | Brand, product name, variant, required details, barcode |
| Printed box | Brand presentation and product context | Brand story, benefits, visual identity, larger messaging |
| Packaging insert | Deeper education or post-purchase communication | Instructions, thank-you message, care guide, QR experience |
| Seal / sticker | Closure, tamper indication or short message | Brand mark, opening message, seal or limited-run callout |
A Simple Rule for Information Allocation
Put information where it is easiest to read, most useful to the customer, and most appropriate for that package component. Do not make the label carry information simply because it is the most obvious printed surface.
When the box needs an integrated insert experience, consider premium rigid presentation packaging as a separate structural layer rather than shrinking the label until it becomes difficult to read.
What Is a Label Dieline?
A dieline is a production reference defining the intended cut or finished shape of a printed piece. Use the printer’s current template for the final file and keep production geometry separate from ordinary artwork when required.
Bleed, Safe Area and Trim
Bleed extends background artwork beyond the intended trim. The safe area keeps important details away from the trim. Exact values should come from the printer’s current production specification.
How to Prepare Label Artwork for Printing
- Confirm finished label dimensions and the production template.
- Place required content and establish hierarchy.
- Keep critical content inside the printer’s safe area.
- Extend edge-to-edge backgrounds into the required bleed.
- Use the requested color mode and spot-color specifications when applicable.
- Check images and graphics at appropriate production resolution.
- Keep dielines and production notes on the layers requested by the printer.
- Proofread every variant, quantity, unit, barcode, ingredient list and disclosure.
- Review a proof and test the physical label on the actual package.
- Approve the final production file only after digital and physical checks pass.
CMYK, Resolution and Print Specifications
CMYK is common in process-color workflows, but the exact production setup depends on the printer and process. 300 PPI is a common reference for raster print imagery, not a universal guarantee. Follow the printer’s specification whenever it differs.
If you are building the artwork in Canva, review the Canva print-preparation guide before exporting the final file so the design workflow and production requirements are considered together.
How to Make a Product Label Easy to Read
- Make the product name easy to identify at a glance.
- Use contrast that remains clear on the chosen material.
- Do not rely on very thin type or low-contrast text for essential information.
- Group dense functional information instead of scattering it across decorative areas.
- Use white space to separate information groups.
- Check the label at actual size, not only zoomed in on a monitor.
- View it on the actual package because curvature and reflections can change readability.
Label Design Mistakes to Avoid
- Designing before measuring the actual package.
- Treating a screen mockup as proof that production is ready.
- Putting important text over curves, seams, closures or high-glare areas.
- Trying to put every message on one small label.
- Choosing material or adhesive without considering the environment.
- Using unsupported sustainability or performance claims.
- Leaving bleed, safe area or dieline requirements until the end.
- Skipping a physical proof.
- Failing to verify barcode size, contrast, placement and quiet zones.
- Designing the label separately from the box when both are part of one customer-facing package.
Product Label Design Checklist
- Product and packaging dimensions measured
- Usable label area identified
- Front/back/wrap/seal format selected
- Required information collected
- Information hierarchy established
- Typography and contrast checked
- Barcode and QR code tested where applicable
- Material selected for the environment
- Adhesive and application method confirmed
- Finish selected
- Dieline and production template confirmed
- Bleed and safe area checked
- Color mode and spot-color requirements confirmed
- Artwork proofread
- Physical proof tested on the actual package
- Final production file approved
Frequently Asked Questions About Label Design
What is label design?
Label design is the planning of a product label’s visual identity, information hierarchy, dimensions, graphics and production requirements so the finished label communicates clearly and works on the real package.
What should a product label include?
It commonly includes brand and product identification plus applicable quantity, ingredients or materials, usage, warnings, traceability, barcode and other required information. Exact requirements depend on the product and market.
How do I choose the right label size?
Measure the usable packaging surface first, account for curves, seams, closures and required content, then test the chosen size at actual scale on the real package.
What is a label dieline?
A dieline is a production reference for the finished cut or shape of the label. Use the printer’s current template for final production.
What is bleed in label printing?
Bleed is extra artwork beyond the intended trim edge. It helps prevent an unprinted edge from appearing after cutting. The exact bleed should come from the printer.
Should I use a label or print directly on the box?
Use a label when flexibility, variable information, sealing or short-run updates matter. Direct box printing is useful when the package itself is the main branded surface. Some packaging uses both.
What material is best for product labels?
There is no universal best material. Paper can suit dry products and tactile presentations; synthetic films can be useful for moisture or repeated handling. Match material to the substrate, environment, adhesive and print process.
How do I design labels for small packaging?
Prioritize essential information, reduce unnecessary copy, use clear hierarchy and contrast, and move supporting information to the box or insert when appropriate.
What resolution should I use for label artwork?
300 PPI is a common reference for raster print imagery, but the correct requirement depends on the printer, process, final size and source artwork.
Should product information go on the label, box or insert?
Use the label for essential identification and required information, the box for broader brand and product presentation, and an insert for deeper education or post-purchase messaging when space allows.
Final Takeaway: Design the Label as Part of the Package
The strongest product label design starts before the graphics. Measure the package, gather the information, decide what the customer needs to see first, choose a format and material that fit the environment, and build the artwork around the printer’s production requirements.
The label should also have a defined role within the wider package. When a custom box, label, insert and other printed components are planned together, each element can carry the information it is best suited to communicate.
For brands moving from label planning into the physical package itself, explore custom packaging and box solutions so the box, label and supporting printed pieces can be considered as one system.